Thursday, March 29, 2012

Program Not Responding

Introduction To “Program Not Responding”

Scenerio 1: You’re sitting in front of your PC and you decide to open an application. You double click the icon and you are now looking at an hour glass. You continue to wait and watch as the hour glass keeps spinning. Finally after two to three minutes you get the dreaded message, “Program Not Responding”.
Scenerio 2: You’re currently working with an application such as Excel. You have spent over an hour putting together a killer spreadsheet, when all of the sudden the program locks up and freezes. Finally after two to three minutes you get the dreaded message, “Program Not Responding”.


Does this look familiar? In this case, the Windows program “Notepad” is not responding.

Least Common Causes

The most popular questions we receive surrounds the fact that people want to know why in the world this happens? There are several reasons for this annoying entity.
First, as you add and remove programs, your system files become scattered throughout your hard drive. This term is called, “fragmented”. Sometimes running your disk defragmenter utility will fix the problem but don’t be surprised if it doesn’t.
Another reason for this is your PC could be infected with melicious SpyWare or AdWare. These tiny programs which run in the background of your PC monitor your every move and slow your computer down to a crawl.
Unfortuneatly one of the symptoms from these programs is receiving the dreaded “Program Not responding” error message.

The Most Common Cause… & The Solution!

The third reason (and most common) is a corrupt system registry. As you install and un-install programs, your registry can become corrupt and unstable.
Just as your car needs regular tune ups, your PC also needs regular maintenance. SpeedyPC can solve your “Program Not Responding” messages!
Once you have rid your system of unwanted SpyWare and AdWare, and ran your first ‘clean up” scan, it is important to make sure your system registry is cleaned at regular intervals. How so? By using SpeedyPC!


Tuesday, March 27, 2012

Computer Keeps Freezing

Computer Freeze Solution

For most of the time, when this happens, the only alternative is to press Ctrl – Alt – Del all at the same time. You will see a box pop up and you will see a list of programs that are currently running on your machine.
You’ll see a ststus column next to each application. Highlight each program individually and click “End Task”. This will close certain programs that are “not responding”. Worst of all, you might also risk the chance of losing all of your unsaved documents.
That is the ultimate price you pay when a program keeps freezing up. I’ve been there, and it isn’t fun.
Thankfully, there are some magical ways that you can adopt to have a smoother processing PC. Some of the techniques will include minimizing the number of programs running at one go, a scheduled maintenance, and also, regular scans for viruses and spywares.

Common Reasons For Computer Freeze

Most of the time, a computer freezes up simply because it does not have access to enough RAM. Hence, the most ideal way to solve this frozen screen problem is to get RAM with a larger capacity.
Every computer requires a certain amount of RAM available to run certain programs. When a program is opened, this particular program uses up part of the memory from the RAM.
Therefore, when there are some constraints in memory, the computer would not be able to take in all programs at one go, and the screen will just freeze, until it finds some free space to process the programs.
Loading too many programs at the same time when starting up your computer can also cause your computer screen to freeze. You are advised to make the necessary changes so that programs you don’t need, do NOT run the minute you switch on your PC.

Regular PC Maintenance

Next, doing some PC maintenance is definitely a good thing if you are really serious about keeping your PC performing at optimal speeds.
Doing computer checkups and cleaning your registry are just some of the more important steps of keeping your PC performing as good as new. Most of these are made available off the Net. There are free versions of virus and spyware scans so make good use of them!
At the same time, use free computer checkups online to detect some of the PC errors that you might not have noticed. This computer checkup software will automatically detect and remove all PC errors simultaneously.
Computer maintenance is definitely a must especially if you are constantly hooked onto your broadband internet connection.
Virus scans and spyware scans are definitely a must for all PC users. If you are saying that you don’t have a trace of spyware, then you really must be kidding me.
Everyone who uses the computer for surfing the internet will definitely have at least a speck of spyware in their computer system. Whether these are harmful or not doesn’t matter, what matters most is that you know how to remove these pests safely.
To do this, use anti-virus and anti-spyware softwares to eliminate all viruses and spyware off from your computer.
Your PC might not speed up instantly, but by doing these steps regularly; it will help to ensure that your PC is still safe and functioning at an acceptable speed.

Can’t Delete Files

I Can’t Delete My Files!

If you cannot delete files when using Microsoft Windows XP or any earlier version of windows, it is most typically due to a right sharing violation with the file.
To put that into simpler terms, whenever a file is being used by a program, that program has “the rights” to that file. If another program tries to access this file while it is being used, a rights sharing violation occurs.
You may have noted these errors whenever you tried to unsuccessfully delete a file. Depending on the operating system you are using, these errors will be syntactically different, but have the same meaning; i.e., you are trying to delete the file without the “rights” to that file.


What Do I Do?

So the question then becomes, “How do I get my rights to delete the file.” Simple enough, if you cannot delete a file because another program has the rights, simply terminate the program using the file.
This may be as simple as closing some programs running in the task bar, like Microsoft Word or Firefox. If the programs you are running are not visible in the task bar, you may need go to your system tray (located in the lower right hand corner of your screen) and shut down the program from there.
Simply right click on the icons and exit each program you suspect to be holding the rights to the file you cannot delete. If you still cannot delete files you want deleted, you will have to go one step further: the task manager.

What Is The Task Manager? 

The task manager is a utility of Windows is a powerful tool that can help you delete files you cannot delete. To access the task manager hold down ctrl + alt + delete at the same time. Make sure you do not do this twice, otherwise Windows will shut down.


Once at the task manager, you can view all applications and system processes currently running. If you know the specific application using the file you cannot delete, you can terminate it safely from the task manager.
If it is a system process you know that is using the file, you can terminate the system process by clicking the “processes” tab, highlighting the process and clicking “end process.”
Don’t be too afraid to click “end process,” if you try to end any process that is vital to keeping Windows afloat, Windows will notify you and give you a second chance to make sure you know what you are doing.

What If I Am Unsure Of What To Shut Down? 

If you are unsure what application or process is using a file, you are really left with only one choice. You will have to close processes and applications at random and try deleting the file. But don’t fret, try looking where the file is located, this should give you a clue as to what applications and processes are using that file.
One trick you may want to try to speed this process up is restarting Windows and trying to delete the file immediately after startup.
If you are certain that no other program is using the files you cannot delete, you may have a rarer problem; one which may or may not need a professional. Renaming files is another quick fix you can use if you cannot delete files.
For example, if the file is a DivX AVI, you may have to rename the file (any name will suffice) and then deleting it due to a conflict DivX AVI files have with Windows XP.


Sunday, March 18, 2012

iPhone tips for iPhone 4s

The iPhone 4's operating system represents a significant improvement on earlier versions of Apple's smartphone operating system. It's also got a new name - iOS - signifying the importance of the iPad alongside the iPhone.
And what's more, iOS 4 is available to users of the iPhone 3GS, third-gen iPod touch and 3G too (albeit with limited features with the latter). iOS 4 will be available for the iPad later in the year.


1. Lock the screen orientation
If you're lying in bed reading an iBook or a page in Safari it can be annoying when the iPhone's orientation keeps flicking between portrait and landscape. You can solve this by activating the new Portrait Lock. Double tap the Home button to reveal all the running apps, then swipe your finger to the right to reveal iPod controls and the Portrait Lock.


2. Tap to focus/zoom in Camera
The iPhone 4's new 5 megapixel camera has a fantastic digital zoom. But to activate it you first need to focus on an object – like a face, for example, in your view. Do this by simply tapping anywhere on the screen. A white square will appear showing you the object that the iPhone is focused on. A zoom bar will also appear, which you can use to zoom into the object you've picked.

3. Multitasking: update your apps
Multitasking is one of the big new features of iOS4, but while all Apple's apps (like Calculator and iPod) are compatible, all third party apps will need to be upgraded to properly multitask. So, you'll need to head to the App Store app on your phone, then visit the Updates section to download a update for each app. This can take a while, but don't forget, the App Store app also multitasks (as it always has), so double tap the Home button to get back to it to save time after selecting each update. There's also a handy "Update all" button to tap.


4. Switch to UK English
If you're getting annoyed that your iPhone thinks colour should be spelt without a 'u' it's because you've got English (US) selected. You can easily switch back to English (UK) for spell checking by tapping the globe button next to the space bar in any app that brings up the soft keyboard (like Mail or Notes). This toggles your iPhone between English (UK) and English (US).

5. Multitasking: kill a running app
After you've been using your iPhone for a while double-tap the Home button to see how many apps you have running - it will be more than you think! Normally you just let the iPhone decide how many it can keep running at once, but you can take matters into your own hands by killing running apps here. Just tap and hold on a running app and a "-" button appears against all of them. Tap this to kill the app.


6. Add an accent on the e and a key
It's possible to quickly add a variety of accents to the letters "e" and "a" when typing on the iPhone's keyboard. Just tap and hold on either key to reveal more options, like "é", for example.


7. Turn caps lock on
If you want to change your typing to capital letters all the time, rather than just for the next letter, then double-tap on the Shift key on the iPhone's keyboard. It will now turn blue, indicating caps lock is on. Just tap it again to turn it off.


8. Camera: take a picture of yourself
The iPhone 4 has a front and rear-facing camera. The rear-facing camera is the high quality 5 megapixel one, and the front facing camera (used mainly for FaceTime video chat) is lower VGA resolution. This means it's now easy to take a picture of yourself (something that was pretty difficult on the previous iPhone models). In the Camera app just tap the Switch button at the top right to change cameras from rear to front.

9. Camera: email a video of yourself talking
You can also use the forward facing camera for recording video, and the iPhone 4's second microphone means it works well capturing anything you say too. In the Camera app tap the switch icon (as in tip 8) then change to video mode using the slider and record a video of yourself talking. Now select it in the Camera roll then tap the Forward icon and select Email Video - job done!


10. Make and rename folders
Organising your apps is so much easier on iPhones running iOS4. Just tap and drag apps on top of each other and you create intelligently named folders. You can rename the folder names Apple chooses though - just tap and hold on an app to make them wiggle, then tap on the folder name and start typing.


11. Make a FaceTime call
When they first get an iPhone 4 a lot of people start looking for the FaceTime app to make video calls. Actually, there's no FaceTime app! To make a video call you simply make a regular call, then tap the FaceTime button in the Phone application. At the moment FaceTime is only available between iPhone 4 users on Wi-Fi. We would expect more compatibility going forward, as the FaceTime technologies are being ratified as an open standard.


12. Hide Caller ID
It's possible to hide your Caller ID when making calls on your iPhone. In the Settings app tap on Phone, then tap on Show My Caller ID and turn it to OFF. (Incidentally, if you ever forget your phone number, you'll find it in here too).


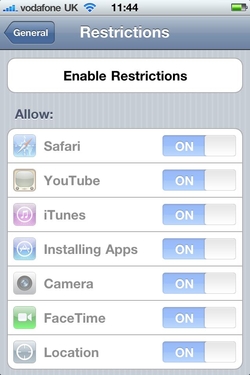
13. Restrict features
If you've brought an iPhone for your kids to use you might want to restrict some options, like the iTunes store and the App Store, for instance. You can also restrict the ability to watch age-rated content. In the Settings app click on General then Restrictions to turn this feature on and choose what you'd like to restrict.


14. Delete a text from the text history
The iPhone Messages app records a history of all your text messages, like an instant message conversation. You can selectively delete old texts though. In Messages tap the Edit button at the top of the screen and then tap the radio button next to the offending text and tap Delete.


15. Watch live TV on your iPhone
Not an iOS 4 tip per se, but you can turn your iPhone into TV thanks to the mobile version of the great TVCatchup website. You need to register, but the service is completely free, and even works over 3G as well as Wi-Fi.


16. iMovie and photos
Apple's iMovie for iPhone 4 app means you can edit movies on your phone. Obviously it lacks the depth of the full iMovie for the Mac, but considering it runs on a phone it's very impressive. You can also add photos to your movie projects with a Ken Burns effect. One useful tip is to create an album of all the photos you plan to add to the project because otherwise you have to search through your camera roll, and for every photo you insert you have to start back at the beginning of the roll.


17. Show PDFs
iBooks for iPhone can display PDF files as well as ebooks (as in the image below). To upload a PDF to your iPhone you have to use iTunes. First drag and drop your PDF file into your iTunes library, then when you sync your iPhone look in the Books tab. Here you'll find options for uploading the PDF. Once you've done that look in the iBooks app and a new PDF tab will have appeared. Tap this.


18. Get better reception
Apple's statement that there's a fault with the way the iPhone displays signal strength, which will be fixed by a future software update, is all very well, but people are still losing signal when gripping the iPhone 4 in a way that covers the gap between the metal bands at the bottom left of the phone. iPhone Bumpers (£25, from Apple), or in fact any third party case that covers the outside edge of the phone will solve the problem, since they prevent your skin from contacting the metal antenna.


19. Turn on SMS character count
A nice little update in the iOS 4 software is the ability to turn on a character count in the Messages app. You'll find the option in Settings/Messages. Now you'll be able to keep your overly long text messages in check!


20. Search more with Spotlight
The Spotlight search has been enhanced significantly in iOS 4. Swipe right from the Home screen to activate it. You'll notice that it now searches more things, including text messages in the Messages app. But if you keep scrolling down the list of results you'll notice two new options at the bottom of the screen – Search Web and Search Wikipedia. These are handy links that open up Safari automatically and start searching for you


Tuesday, March 6, 2012

How to Change Your Wireless Router's Admin Password

Here are the general steps you will need to follow in order to change and/or reset the password on your wireless router:

If you have completely lost the password that you set and need to set the router back to it's factory default password, perform the following steps:
Below are general instructions only. Directions vary by make and model of router. Please consult your router's operating manual before performing any kind of reset procedure, and always follow proper safety precautions indicated in your router's documentation.
PLEASE NOTE: The first step in this process will wipe out all of your router's configuration settings and set them back to their out-of-the-box factory defaults. You will have to change all your routers settings such as your wireless network SSID, password, encryption settings, etc, after performing this step.

1. Press and hold the reset button on the back of your wireless router

You will probably have to hold the reset button from 10 to 30 seconds depending on your brand of router. If you hold it for too short a time it will simply reset the router but won't revert back to its factory default settings. On some routers you may have to use a pin or thumbtack to press the button if it is recessed inside the router.

2. Connect a computer to one of your router's Ethernet ports (but not the one that says WAN)

Most router's have a web browser-accessible administrator page that you must log in to in order to access the router's configuration settings. Some routers disable administration via wireless, so you will need to ensure that you are connected to the router via an Ethernet cable before attempting to access the router's configuration page.

3. In the browser address bar, enter the IP address of your router's administration interface

Most routers have what is called a non-routable internal IP address such as 192.168.1.1 or 10.0.0.1. This is an internal address that cannot be accessed from the internet.
Here are the standard admin interface addresses used by some of the more popular wireless router manufactures. You may have to consult your specific router's manual for the correct address. The following list is some of the default IP addresses based on my research and may not be accurate for your specific make or model:
Linksys - 192.168.1.1 or 192.168.0.1
DLink - 192.168.0.1 or 10.0.0.1
Apple - 10.0.1.1
ASUS - 192.168.1.1
Buffalo - 192.168.11.1
Netgear - 192.168.0.1 or 192.168.0.227

4. Enter the default administrator login name (usually "admin") followed by the default administrator password.

You can locate the the default admin name and password for your specific router by checking the manufacturer's website or by Googling "Default Admin Password" followed by your router's brand name and model.

5. Click on the "Admin" page from your router's configuration page and create a strong password 

Be sure you enter a strong complex password for your router's admin password. If you ever looe this password you will have to repeat the steps above.
If you didn't lose you router password but just don't know how to change it, you can skip steps 1 and 2 and enter the admin user name and password that you have into step 4. This will allow you to change your wireless router's password without wiping out all your other router's settings.


Saturday, March 3, 2012

Getting into Windows Safe Mode.

Windows 2000 / XP users
Tip If you are running Safe Mode because you cannot get into Windows, you may want to first try loading the last known good configuration.
To get into the Windows 2000 / XP Safe mode, as the computer is booting press and hold your "F8 Key" which should bring up the "Windows Advanced Options Menu" as shown below. Use your arrow keys to move to "Safe Mode" and press your Enter key.
Note: With some computers, if you press and hold a key as the computer is booting you will get a stuck key message. If this occurs, instead of pressing and holding the "F8 key", tap the "F8 key" continuously until you get the startup menu.
Trouble Getting into Windows 2000 or Windows XP Safe mode - If after several attempts you are unable to get into Windows 2000 or Windows XP Safe Mode as the computer is booting into Windows, turn off your computer. When the computer is turned on the next time Windows should notice that the computer did not successfully boot and give you the Safe Mode screen.

Once you're done in Safe mode if you want to get back into Normal Windows restart the computer like you normally would and let it boot normally.

Microsoft Windows Vista and Windows 7 users
Tip If you are running Safe Mode because you cannot get into Windows, you may want to first try loading the last known good configuration.
To get into the Windows Vista and Windows 7 Safe Mode, as the computer is booting press and hold your "F8 Key" which should bring up the "Windows Advanced Options Menu" as shown below. Use your arrow keys to move to "Safe Mode" and press your Enter key.
Note: With some computers if you press and hold a key as the computer is booting you will get a stuck key message. If this occurs, instead of pressing and holding the "F8 key", tap the "F8 key" continuously until you get the startup menu.
Trouble Getting into Safe mode - If after several attempts you are unable to get into Safe Mode as the computer is booting into Windows, turn off your computer. When the computer is turned on the next time Windows should notice that the computer did not successfully boot and give you the Safe Mode screen.

Once you're done in Safe mode if you want to get back into Normal Windows restart the computer like you normally would and let it boot normally.

Windows 98 / ME users
To get into Windows 98 / ME Safe Mode, as the computer is booting press and hold your "F8 key" on the top of your keyboard or press and hold the left or right Ctrl key as the computer is booting. If done properly you should get into the "Windows 98 / ME Startup Menu" similar to the below screen example. In this menu choose option 3 by pressing the 3 key and press enter. 
Note: With some computers if you press and hold a key as the computer is booting you will get a stuck key message. If this occurs, instead of pressing and holding the "F8 key", tap the "F8 key" continuously until you get the startup menu. 
Once you're done in Safe mode if you want to get back into Normal Windows restart the computer like you normally would and let it boot normally.

Windows 95 users
To get into Windows 95 Safe Mode, as the computer is booting, when you either hear a beep or when you see the message "Starting Windows 95", press your F8 key on the top of your keyboard. If done properly you should get into the Windows 95 Startup menu similar to the below screen. In this menu choose option 3 by pressing the 3 key and press enter.