Monday, February 25, 2013

FBI virus. How to handle!

This scam presents about itself for the victim as 'The FBI Federal Bureau Investigation' alert and aggressively claims that computer is blocked because of the Copyright and Related Rights Law violation or other reason.However, if you find yourself blocked by a program, which tells that you have been illegally using or distributing copyrighted content, viewing or distributing pornographic content and spreading malware to other computers, you must ignore such alert first of all and remove FBI virus immediately!
There are many options to remove the FBI virus on your own without the help or a professional.


This infection gets inside the system through security vulnerabilities found when user visits infected websites or downloads infected files.
The biggest issue, which is caused by this ransomware, is that similarly to its earlier versions, it completely blocks its victim's computer, 'locks' it and disables all the programs found there. In order to 'unlock' the system, FBI virus shows its warning and requires to pay the fine through MoneyPak. However, you must have already understood that you must never pay this $100 fine if you don't want to help for the scammers who are collecting these fines.

There are several different versions of this virus:

FBI Moneypak
FBI Green Dot Moneypak Virus
FBI Virus Black Screen
FBI Online Agent 
FBI Cybercrime Division virus

Removal process for FBI virus.

  1. Malware Removal Software – Scan, detect, and remove the FBI virus (free or paid recommendations)
  2. Manual Removal – Manually search for and remove FBI virus files and entries
  3. System Restore – Restore PC to a date and time before infection (includes different access options)
  4. Safe Mode With Networking – Manually remove files and/or scan and remove malware (reset proxy settings if needed)
  5. Flash Drive Option – Load Antivirus (AM) software to a flash drive, scan and remove malware
  6. Optical CD-R Option – Scan and remove malware
  7. Slave Hard Disk Drive Option – Scan, detect, and remove malware
I collected this informations from several sites but i strongly recommend  safe mode with networking at first place and then you can easy download malware removal program (ill recommend Malwarebyte cause it's free and very effective). Or when you are in safe mode try search for virus manually, it will give you some experience for future problems as well. Also system restore is very good option for same problem, you can try that first but it's possible that virus already ruined your chekpoints and it will not work properly.
Anyway if you have some basic knowledge you can do it yourself using any of options above and you will solve your problem. Here is free download link for Malwarebyte.


Manual FBI virus removal (special skills needed!):

  1. Reboot you infected PC to 'Safe mode with command prompt' to disable FBI virus (this should be working with all versions of this threat)
  2. Run Regedit
  3. Search for WinLogon Entries and write down all the files that are not explorer.exe or blank. Replace them with explorer.exe.
  4. Search the registry for these files you have written down and delete the registry keys referencing the files.
  5. Reboot and run a full system scan with updated SpyHunter to remove remaining files.


Sunday, February 10, 2013

Next tutorial

Bellow you can comment which tutorial you want to be next. If i can't find suitable one from my sources i will write it myself.


Windows 7 installation tutorial

Backup
You may be installing Windows 7 on a machine that already has an operating system installed. In that case, you will have to consider what to do with existing data on the disk.
You may want to completely wipe the existing data and start clean. Or you may want to incorporate Windows 7 into the existing setup, whether as a side-by-side installation or an upgrade.Whatever you choose, please make sure your files are safely backed up, so that you do not accidentally, irrecoverably overwrite critical data during the installation.
Installation key
Please make sure you have the Windows 7 installation key available. Without it, you will not be able to install the operating system.
Drivers for the computer hardware
There is no guarantee that Windows 7 built-in set of drivers will include your specific hardware. Therefore, please make sure you have the right drivers available before you start the installation. The drivers usually come on CD/DVDs supplied by the manufacturer with newly purchased hardware. Alternatively, you may also download them from official vendor websites.
Having the drivers available will make sure that after you have installed Windows 7, your system will perform to its fullest. If you meet the above three requirements, we are ready to go.

Boot from Windows 7 DVD

The first step is to place your Windows 7 DVD into the DVD tray and boot the machine. Your computer needs to be configured to boot from DVD. This is done via BIOS. On most computers, the BIOS menu can be accessed by pressing either the F2 or Del keys while the machine is booting.
BIOS
Once you have completed this stage, Windows 7 will start loading. If you see the below image, you're doing well so far.
Starting
After a few moments, you will reach the installation menu. Your first step is to choose the language and the keyboard.
Begin
You will be now taken to the Install now menu. We have already prepared for the installation, so you can click Install now and proceed.
Install now
The next step is to accept the license agreement.
License
After this, you will have to decide whether you want to Upgrade an existing installation or perform a Custom (advanced) installation, which is basically creating a new copy of Windows.
We will discuss multiple boots in a separate tutorial. For now, if you are interested, you may want to explore a Dual boot tutorial that tackles this issue from the Linux side, with a Linux distribution being installed alongside Windows XP. In the soon-to-come multiple-boot tutorial, I will address the installation of Windows 7 alongside other Windows (XP and 7), as well as Linux.
Personally, I recommend you install a new copy. Fresh installations are always better. Your machine starts in a pristine state and does not rely on old leftovers.
Type

Partitioning

The next step is to choose where you want to install Windows 7. This is probably the most important part of the entire installation, so you need to be very careful here and make the right choices.
Where
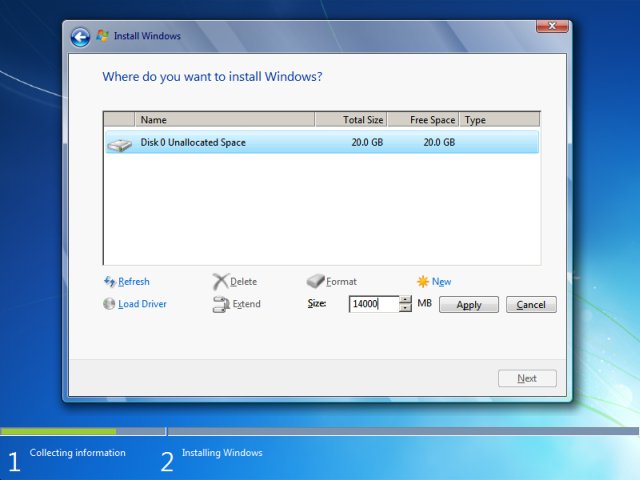
We only have a 20GB unallocated space on our disk, so we have no dilemma. However, it is possible that you may have other partitions from previous installations present, or you may have created a custom partitioning setup before starting Windows 7 installation using a third-party partitioning software, like GParted. We will soon this discuss in greater detail. For now, let us create our Windows 7 partitions.
Inexperienced users can simply highlight the unallocated space and click Next. The partitioning layout will be created for them. However, we want to explore additional features. To this end, we need to expand the Drive options (advanced).
Advanced
You now have the option to create new partitions, format them with a desired filesystem, change the size of existing or newly created partition (Extend), or delete them. The Load Driver function is usually necessary if you want to create more complex setups like RAID, but this is currently beyond the scope of this tutorial.
We will create a new partition. According to official system requirements, Windows 7 needs 16GB of free space. However, you can do with less. The minimum recommended space for a partition where you want to place Windows 7 is 10350MB. Eventually, the installation itself will take approx. 7GB.
Just for your information, here's a snippet of what would happen if you try to install Windows 7 on a partition that does not meet the minimum expected size limit:

This does not mean your installation won't succeed. It might, but why risk it?
Size
Windows 7 installer will now tell you that it will have to create an additional partition for the core system files. This will be a small primary partition ahead of your newly created one.
System partition
This is what it looks like:
Layout
Important technical bits to pay attention to!
We now have a system partition and a primary partition, plus some free space. In purely technical terms, there is no such thing as a partition of the type system. There are only two types of partitions: primary and logical. The above-mentioned partition is a primary partition.
In total, there can only be up to four primary partitions on any physical disk. Windows 7, by itself, creates and uses at least two primary partitions. If we created another partition in the free space, it would too, become a primary partition.
Some quick math, this means that if we want to have more than two Windows 7 installations side by side, we don't have enough partitions available.
Recommendation:
Use a third-party partitioning tool to create a partition layout beforehand. This will allow you to place Windows 7 files on a logical partition, saving yourself the precious commodity of wasting primary partitions on what is essentially non-system data. We will see this example in a separate tutorial.
If you're using ONLY Windows 7 to create a partition layout on your system, then you should just create a partition with a sufficient size to hold the Windows 7 data files and nothing else. The system partition will be added. Leave the handling of any unpartitioned, free space after the installation.
Layout

Begin installation

If you're comfortable with your setup, highlight the created partition and click Next. Windows 7 will be installed to this partition. Depending on your hardware, this can take some time. My testing shows approx. 30-40 minutes.
Installing
During the installation, your computer may restart several times. Let it be.

User settings

Eventually, you will be asked to provide your username and a computer name. You will also have to password-protect your account. This is most advisable. You should opt for a strong password.
Username
Password

Activation

The next step is to activate your Windows. Grab your key and type it here.
Activation

Updates

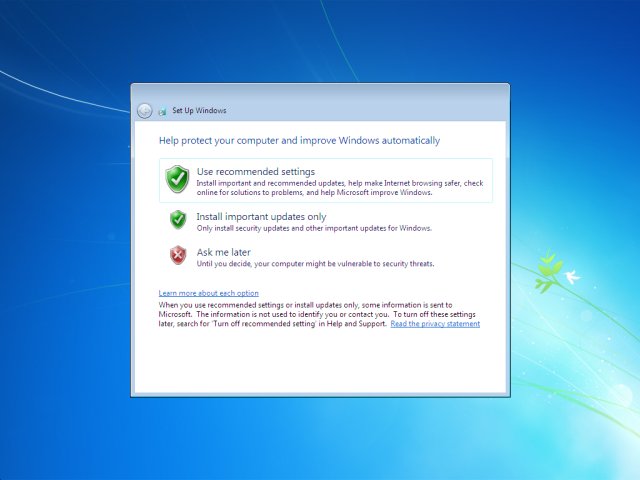
You will be asked to configure your updates. You can choose either setting you like. However, I recommend you configure this choice later, after Windows 7 is installed and running properly.
We will discuss this separately in the Windows 7 security tutorial. Therefore, I will choose Ask me later, but you may want to go for either the first or the second option, as you see fit.
Updates

Time zone

Configure your time zone:
Time zone

Location

Your location will determine the firewall settings for your newly installed Windows 7. You have three choices: home, work or public network. Home and work networks are supposed to be trusted, so you should not experience any problems adding other machines to your group or sharing data with them.
However, the public network is meant to be untrusted. So if you have installed Windows 7 in, let's say, Internet cafe, then you should choose the third option.
Location

Congratulations!

Congratulations, you have just successfully installed Windows 7.
Installed


Monday, January 28, 2013

Adding a Printer from the BC Network

To add a printer from the BC network using Windows Vista (Windows 7 skip to step 4):
  1. Click Start, then select Control Panel.
  2. Click Classic View in the left panel.
  3. Double-click the Printers icon:
  4. Windows 7: Click Start, then select Devices and Printers.
  5. Click Add Printer (see Figure 1).
    Figure 1.
    Figure 1.

  6. Select Add a network, wireless, or Bluetooth printer, then click Next (see Figure 2).
    Figure 2.
    Figure 2.

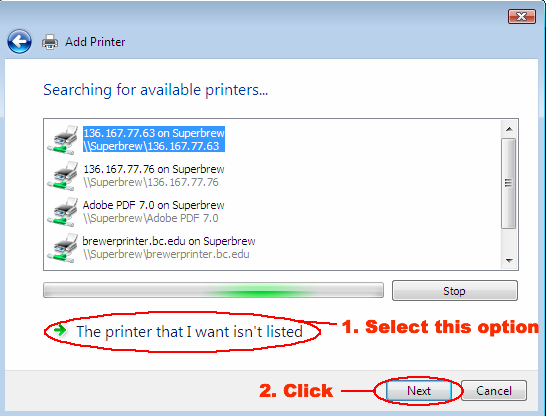
  7. Select The printer that I want isn't listed, then click Next (see Figure 3).
    Figure 3
    Figure 3.

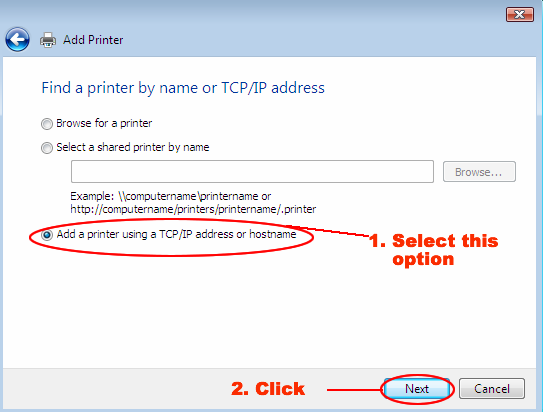
  8. Select Add a printer using a TCP/IP address or hostname, then click Next (see Figure 4).
    Figure 4
    Figure 4.

  9. In the Hostname or IP address box, enter the printer name followed by ".bc.edu", then click Next (see Figure 5).
    Figure 5
    Figure 5.

  10. Select the type of printer you are using, then click Next (see Figure 6).
    Figure 6
    Figure 6.

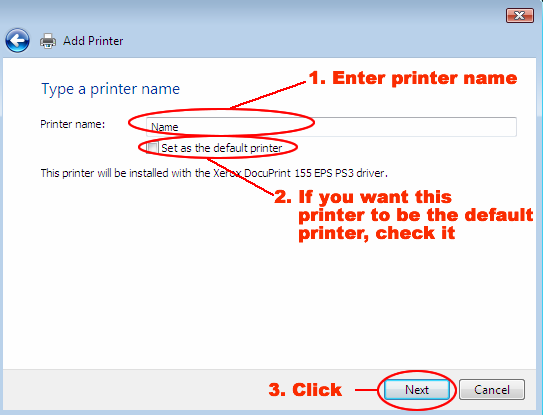
  11. On the "Type a printer name window," do the following (see Figure 7):
    • In the Printer name box, enter a name for your printer so you can identify it.
    • If you want to make this printer your default printer, check Set as the default printer.
    • Click Next.
    Figure 7
    Figure 7.


  12. On the "You've successfully added" window, do the following (see Figure 8):
    • Click Print a test page.
      Note:
      If the test page did not print correctly, call your TC (bc.edu/tc).
    • When you have successfully printed a test page, click Finish.
    Figure 8.

Wednesday, January 16, 2013

Windows 8

Windows 8 is the current release of the Windows operating system, produced by Microsoft for use on personal computers, including home and business desktops, laptops, tablets, and home theater PCs. Development of Windows 8 started before the release of its predecessor, Windows 7, in 2009. Its existence was first announced at CES 2011, and followed by the release of three pre-release versions from September 2011 to May 2012. The operating system was released to manufacturing on August 1, 2012, and was released for general availability on October 26, 2012.
Windows 8 introduces significant changes to the operating system's platform, primarily focused towards improving its user experience on mobile devices such as tablets to rival other mobile operating systems like Android and Apple's iOS.Windows 8 introduces a new touch-friendly shell and user interface based on Microsoft's "Metro" design language, featuring a new Start screen with a grid of dynamically updating tiles that represent applications. The Start screen replaces the "Start menu" of earlier Windows versions. There is a new app platform with an emphasis on touchscreen input, and the new Windows Store to obtain and/or purchase applications to run on the operating system.
In addition, Windows 8 takes advantage of new or emerging technologies like USB 3.0, 4Kn Advanced Format, near field communications, cloud computing, and the low-power ARM architecture. It includes new security features such as malware filtering, built-in antivirus capabilities, a new installation process optimized for digital distribution, and support for secure boot (a UEFI feature which allows operating systems to be digitally signed to prevent malware from altering the boot process). Synchronization of certain apps and settings between multiple devices is supported.
Windows 8 was released to mixed reception. Although reaction towards its performance improvements, security enhancements, and improved support for touchscreen devices was positive, the new user interface of the operating system has been widely criticized for being confusing and having a steep learning curve (especially when used with a keyboard and mouse instead of a touchscreen). Despite these shortcomings, 60 million Windows 8 licenses have been sold through January 2013, This includes upgrades and sell in to OEMs for new PCs.


New and changed features

New features and functionality in Windows 8 include a faster startup through UEFI integration and the new "Hybrid Boot" mode (which hibernates the Windows kernel on shutdown to speed up the subsequent boot), a new lock screen with a clock and notifications, and the ability for enterprise users to create live USB versions of Windows (known as Windows To Go). Windows 8 also adds native support for USB 3.0 devices, which allow for faster data transfers and improved power management with compatible devices, and 4Kn Advanced Format support, as well as support for near field communication to facilitate sharing and communication between devices.
Windows Explorer, which has been renamed File Explorer, now includes a ribbon in place of the command bar. File operation dialog boxes have been updated to provide more detailed statistics, the ability to pause file transfers, and improvements in the ability to manage conflicts when copying files. A new "File History" function allows incremental revisions of files to be backed up to and restored from a secondary storage device, while Storage Spaces allows users to combine different sized hard disks into virtual drives and specify mirroring, parity, or no redundancy on a folder-by-folder basis.
Task Manager has also been redesigned, including a new processes tab with the option to display fewer or more details of running applications and background processes, a heat map using different colors indicating the level of resource usage, network and disk counters, grouping by process type (e.g. applications, background processes and Windows processes), friendly names for processes and a new option which allows users to search the web to find information about obscure processes. Additionally, the Blue Screen of Death has been updated with a simpler and modern design with less technical information displayed.


Safety and security

Additional security features in Windows 8 include two new authentication methods tailored towards touchscreens (PINs and picture passwords), the addition of antivirus capabilities to Windows Defender (bringing it in parity with Microsoft's Security Essentials software) SmartScreen filtering integrated into the desktop, and support for the "Secure Boot" functionality on UEFI systems to protect against malware infecting the boot process. Parental controls are offered through the integrated Family Safety software, which allows parents to monitor and control their children's activities on a device with activity reports and safety controls. Windows 8 also provides integrated system recovery through the new "Refresh" and "Reset" functions. Windows 8's first security patches would be released on November 13, 2012; it would contain three critical (most severe as per Microsoft) fixes.

Hardware requirements

PCs

The minimum system requirements for Windows 8 are slightly higher than those of Windows 7. Notably, Windows 8 now requires that a system's CPU support certain hardware features, specifically the PAE, NX bit, and SSE2. Windows Store apps require a screen resolution of 1024×768 or higher to run, while a screen resolution of 1366×768 or higher is required to use the snapping functionality for apps.
Minimum hardware requirements for Windows 8
Criteria Minimum Recommended
Processor 1 GHz clock rate
IA-32 or x64 architecture
Support for PAE, NX and SSE2
x64 architecture
Second Level Address Translation (SLAT) support
Memory (RAM) IA-32 edition: 1 GB
x64 edition: 2 GB
4 GB
Graphics Card DirectX 9 graphics device
WDDM 1.0 or higher driver
DirectX 10 graphics device
Display screen 1024×768 pixels 1366×768 pixels
Input device Keyboard and mouse A multi-touch display screen
Hard disk space IA-32 edition: 16 GB
x64 edition: 20 GB

Other
USB 3.0 port
UEFI v2.3.1 Errata B with Microsoft Windows Certification Authority in its database
Trusted Platform Module (TPM)
Internet connectivity


Tablets and convertibles

Microsoft released minimum hardware requirements for new tablet and convertible devices designed for Windows 8, and defined a convertible form factor as a standalone device that combines the PC, display and rechargeable power source with a mechanically attached keyboard and pointing device in a single chassis. A convertible can be transformed into a tablet where the attached input devices are hidden or removed leaving the display as the only input mechanism.

Hardware certification requirements for Windows tablets
Graphics Card DirectX 10 graphics device with WDDM 1.2 or higher driver
Storage 10 GB free space, after the out-of-box experience completes
Standard buttons 'Power', 'Rotation lock', 'Windows Key', 'Volume-up', 'Volume-down'
Screen Touch screen supporting a minimum of 5-point digitizers and resolution of at least 1366x768. The physical dimensions of the display panel must match the aspect ratio of the native resolution. The native resolution of the panel can be greater than 1366 (horizontally) and 768 (vertically). Minimum native color depth is 32-bits.
Camera Minimum 720p
Ambient light sensor 1–30k lux capable with dynamic range of 5–60k
Accelerometer 3 axes with data rates at or above 50 Hz
USB 2.0 At least one controller and exposed port.
Connect Wi-Fi and Bluetooth 4.0 + LE (low energy)
Other Speaker, microphone, magnetometer and gyroscope. If a mobile broadband device is integrated into a tablet or convertible system, then an assisted GPS radio is required. Devices supporting near field communication need to have visual marks to help users locate and use the proximity technology. The new button combination for Ctrl + Alt + Del is Windows Key + Power.


New computer virus list

OPRAH WINFREY VIRUS: Your 200MB hard drive suddenly shrinks to 80MB, and then slowly expands back to 200MB.
AT&T VIRUS: Every three minutes it tells you what great service you are getting.
MCI VIRUS: Every three minutes it reminds you that you're paying too much for the AT&T virus.
PAUL REVERE VIRUS: This revolutionary virus does not horse around. It warns you of impending hard disk attack---once if by LAN, twice if by C:>.
POLITICALLY CORRECT VIRUS: Never calls itself a "virus", but instead refers to itself as an "electronic microorganism."
RIGHT TO LIFE VIRUS: Won't allow you to delete a file, regardless of how old it is. If you attempt to erase a file, it requires you to first see a counselor about possible alternatives.
ROSS PEROT VIRUS: Activates every component in your system, just before the whole darn thing quits.
MARIO CUOMO VIRUS: It would be a great virus, but it refuses to run.
TED TURNER VIRUS: Colorizes your monochrome monitor.
ARNOLD SCHWARZENEGGER VIRUS: Terminates and stays resident. It'll be back.
DAN QUAYLE VIRUS #2: Their is sumthing rong wit your komputer, ewe jsut cant figyour out watt!
GOVERNMENT ECONOMIST VIRUS: Nothing works, but all your diagnostic software says everything is fine.
NEW WORLD ORDER VIRUS: Probably harmless, but it makes a lot of people really mad just thinking about it.
FEDERAL BUREAUCRAT VIRUS: Divides your hard disk into hundreds of little units, each of which does practically nothing, but all of which claim to be the most important part of your computer.
GALLUP VIRUS: Sixty percent of the PCs infected will lose 38 percent of their data 14 percent of the time. (plus or minus a 3.5 percent margin of error.)
TERRY RANDALL VIRUS: Prints "Oh no you don't" whenever you choose "Abort" from the "Abort" "Retry" "Fail" message.
TEXAS VIRUS: Makes sure that it's bigger than any other file.
ADAM AND EVE VIRUS: Takes a couple of bytes out of your Apple.
CONGRESSIONAL VIRUS: The computer locks up, screen splits erratically with a message appearing on each half blaming the other side for the problem.
AIRLINE VIRUS: You're in Dallas, but your data is in Singapore.
FREUDIAN VIRUS: Your computer becomes obsessed with marrying its own motherboard.
PBS VIRUS: Your programs stop every few minutes to ask for money.
ELVIS VIRUS: Your computer gets fat, slow and lazy, then self destructs; only to resurface at shopping malls and service stations across rural America.
OLLIE NORTH VIRUS: Causes your printer to become a paper shredder.
NIKE VIRUS: Just does it.
SEARS VIRUS: Your data won't appear unless you buy new cables, power supply and a set of shocks.
JIMMY HOFFA VIRUS: Your programs can never be found again.
CONGRESSIONAL VIRUS #2: Runs every program on the hard drive simultaneously, but doesn't allow the user to accomplish anything.
KEVORKIAN VIRUS: Helps your computer shut down as an act of mercy.
IMELDA MARCOS VIRUS: Sings you a song (slightly off key) on boot up, then subtracts money from your Quicken account and spends it all on expensive shoes it purchases through Prodigy.
STAR TREK VIRUS: Invades your system in places where no virus has gone before.
HEALTH CARE VIRUS: Tests your system for a day, finds nothing wrong, and sends you a bill for $4,500.
GEORGE BUSH VIRUS: It starts by boldly stating, "Read my docs....No new files!" on the screen. It proceeds to fill up all the free space on your hard drive with new files, then blames it on the Congressional Virus.
CLEVELAND INDIANS VIRUS: Makes your 486/50 machine perform like a 286/AT.
LAPD VIRUS: It claims it feels threatened by the other files on your PC and erases them in "self defense".
CHICAGO CUBS VIRUS: Your PC makes frequent mistakes and comes in last in the reviews, but you still love it.
ORAL ROBERTS VIRUS: Claims that if you don't send it a million dollars, it's programmer will take it back.

Wednesday, August 1, 2012

Autoplay Code for Embedded Videos

This is tutorial how to make your embedded YouTube videos autoplay.

- This is close look of embed video code :

<object width="425" height="350"><param name="movie" value="http://www.youtube.com/v/OdT9z-JjtJk"></param><embed src="http://www.youtube.com/v/OdT9z-JjtJk" type="application/x-shockwave-flash" width="425" height="350"></embed></object>

-To make it autoplay, just put &autoplay=1 after the video ID so it looks like this: 

<object width="425" height="350"><param name="movie" value="http://www.youtube.com/v/OdT9z-JjtJk&autoplay=1"></param><embed src="http://www.youtube.com/v/OdT9z-JjtJk&autoplay=1" type="application/x-shockwave-flash" width="425" height="350"></embed></object>

-Also you can change parameters width and height to suit your needs.
 This is sample how it can be done :

<object width="420" height="315"><param name="movie" value="http://www.youtube.com/v/3y3EuVjQt3M?version=3&amp;hl=en_US&amp;autoplay=1" /><param name="allowFullScreen" value="true" /><param name="allowscriptaccess" value="always" /><embed src="http://www.youtube.com/v/3y3EuVjQt3M?version=3&amp;hl=en_US&autoplay=1" type="application/x-shockwave-flash" width="220" height="115" allowscriptaccess="always" allowfullscreen="true"></embed></object>

-It's simple as that enjoy :)